| ezDICOM DICOM viewer |
| Index
This software is designed to display most medical images: MRI, CT, X-ray, and ultrasound. All versions of ezDICOM can automatically detect the format of a medical image and display it on the screen. The ezDICOM project will appeal to several groups of people:
My DICOM page lists a large number of free DICOM viewers. So what are the benefits of ezDICOM? The main benefit is that the software is easy to use, mature (stable, few if any bugs) and can view a wide range of medical images including proprietary formats as well as images in the DICOM standard. For example, In addition, most free DICOM viewers only read a small subset of the DICOM images available, while ezDICOM can view a broad range of images. In addition to DICOM images, thesoftware will automatically recognize and display Analyze, GE (LX, Genesis), Interfile, Siemens (Magnetom, Somatom) and NEMA images. The greatest strength of ezDICOM is that it is free and open source. There are many variations of medical images 'in the wild' - many of these are poorly or incorrectly documented. By being free, ezDICOM has developed a wide user base, and this ensures the quality of the code. Thousands of people have used ezDICOM and sent in unusual and rare images, and the code is now mature and able to read virtually all the popular medical images. Therefore, the users are the most important strength of this software. It is important to acknowledge the many people who shared their images with the developers. The advantage of being open source is that programmers can modify and improve the code if they want. The project was started by Wolfgang Krug and has been expanded and maintained by Chris Rorden. Development was particularly aided by Earl F. Glynn's general programming tutorials and David Clunie's medical imaging FAQ. Special mention should also go to Jakob Scholbach (coauthored the lossless JPEG decoder), Armando Alaminos Bouza (Somatom formats), Yves Martel (various formats) and Sebastien Barre (useful suggestions). This software is covered by the BSD open source license. You can distribute both compiled projects and the source code. However, you should also distribute the license (the compiled standalone program makes this easy: the license is built into the 'about' window). The license also notes that the software is provided 'as is', use it at your own risk. This software attempts to reproduce medical images accurately. However, it is not designed for clinical use: computer monitors can vary tremendously in image quality. All grayscale images are rendered in 256-levels of gray (this is true of all of the viewers which I know of). |
| ezDICOM
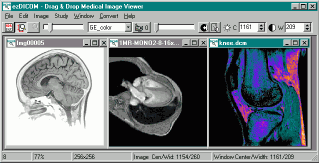
for users Introduction. The standalone ezDICOM for windows program is a basic but useful tool for viewing medical images. This software will run on computers with Windows 95 or later and requires less than 300 Kb of disk space. To view an image, you simply drag and drop the image onto the program (or you can choose 'Open...' from the 'File' menu). Despite the ease of use, ezDICOM has a number of powerful features. For example, you can set the brightness and contrast of an image with great precision.You can also animate images that have multiple slices (e.g. see a heart beating over time or see different depths into the brain). Installation. To download the ezDICOM standalone application [version 1, release 24 ], shift+click here. The program is distributed as a compressed zip file - simply extract the files and double click on ezDICOM.exe. Delphi source code is also included. |
 Behringer Umc Series Usb Audio Driver V5300 Free ((free))The Behringer UMC Series USB Audio Driver v5.30.0 is a crucial piece of software for Windows users looking to unlock the full potential of their U-Phoria audio interfaces. Originally released on January 31, 2022, this specific version remains a stable "go-to" for many producers and musicians due to its reliable low-latency performance on Windows 10 and 11. Why You Need the v5.30.0 Driver While some Behringer devices like the UM2 are plug-and-play using standard USB audio codecs, the "HD" series (such as the UMC202HD and UMC404HD) requires these dedicated drivers to access professional features. Low Latency Monitoring: The driver provides a dedicated ASIO interface, which is essential for recording vocals or instruments without the "lag" that can disrupt a performance. High-Fidelity Audio: It enables the interface to operate at its maximum sample rates, up to 192 kHz and 24-bit resolution, ensuring pristine digital captures. Multi-Channel Support: For devices like the UMC1820, the driver allows Windows and your DAW (Digital Audio Workstation) to see all individual inputs and outputs. Compatibility: This version was specifically optimized for modern Windows environments (Win 10/11) to resolve issues found in older 4.x versions. Supported Devices The v5.30.0 driver is a universal package for the entire U-Phoria UMC series, including: UMC202 / UMC202HD UMC204 / UMC204HD UMC404 / UMC404HD Note: For smaller interfaces like the UMC22 or UM2, Behringer often recommends using the third-party ASIO4ALL driver if dedicated drivers are unavailable for your specific OS. Installation Guide (Windows) Follow these steps to ensure a clean installation: behringer-umc-series-usb-audio-driver.updatestar.comhttps://behringer-umc-series-usb-audio-driver.updatestar.com BEHRINGER UMC Series USB Audio Driver - Download Behringer UMC Series USB Audio Driver v5.3.0.0 — Overview and Installation Guide Summary
Key features
Compatibility
Before you install
Installation (Windows)
Troubleshooting
Uninstalling
Where to get it
Notes and cautions
If you want, I can:
Getting your home studio running smoothly often comes down to one thing: having the right drivers. If you are using a Behringer U-Phoria UMC series interface, the version 5.30.0 driver is a stable, high-performance choice for Windows users. Here is a blog post designed to help your readers find, install, and understand why this specific driver matters. How to Download and Install the Behringer UMC USB Driver v5.30.0 If you’ve ever experienced "crackling" audio or high latency while recording, your driver is likely the culprit. For owners of the Behringer U-Phoria series (like the UMC202HD, UMC404HD, or UMC22), the v5.30.0 USB Audio Driver is a go-to version for Windows 10 and 11 users. In this guide, we’ll walk you through why this driver is essential and how to get it running for free. 🎙️ Why You Need the Official UMC Driver While Windows can sometimes recognize Behringer interfaces automatically using generic "Plug and Play" drivers, these often fall short for professional recording. The official v5.30.0 driver provides: Ultra-Low Latency: Essential for monitoring your voice or instrument in real-time without delay. behringer umc series usb audio driver v5300 free ASIO Support: Allows your DAW (Ableton, FL Studio, Reaper) to talk directly to your hardware. Sample Rate Stability: Ensures your interface stays locked at 48kHz, 96kHz, or 192kHz without crashing. The UMC Control Panel: A dedicated app to manage buffer sizes and input/output settings. 📥 Where to Download v5.30.0 for Free Behringer provides all drivers for free via their official ecosystem. Visit the Official Site: Go to the Behringer Downloads page. Search by Product: Type in your model (e.g., "UMC404HD"). Filter by "Software": Look for the "USB Audio Driver" section. Select v5.30.0: While newer versions may exist, v5.30.0 is widely cited in the community for its stability on older Windows 10 builds. 🛠️ Step-by-Step Installation Guide Follow these steps to ensure a "clean" install and avoid hardware conflicts: Disconnect your Interface: Unplug the USB cable from your computer before starting. Uninstall Old Drivers: Go to Add or Remove Programs and remove any previous Behringer or ASIO4ALL drivers. Run the Installer: Open the Reconnect: When the installer asks (or finishes), plug your U-Phoria interface back into a USB port. Restart: Always reboot your PC to finalize the driver registry. 💡 Pro Tip: Setting the Buffer Size The Behringer UMC Series USB Audio Driver v5 Once installed, look for the UMC Control Panel in your taskbar tray. For the best performance: For Recording: Set the Buffer Size to 128 or 256 samples to minimize lag. For Mixing: Set it to 1024 or 2048 samples to give your CPU more "breathing room" for plugins. Final Thoughts The Behringer UMC series offers some of the best value in the audio world, but the hardware is only as good as the software driving it. Installing v5.30.0 ensures you get the professional-grade performance you need for your podcasts, music, or streams. To make this post even better for your audience, I can help you with a few more things: Do you need a Comparison Table between v5.30.0 and the newer v5.57.0 drivers? Should I add a list of DAW-specific setup instructions for Reaper or Ableton? The Behringer UMC Series USB Audio Driver is a freeware software package essential for Windows users to achieve low-latency performance and full DAW compatibility with Behringer U-Phoria interfaces. While newer versions like v5.12.0 or v5.51 are common, version v5.30.0 is a stable release often sought for its reliability with specific Windows builds. Key Features ASIO Support: Provides high-performance ASIO (Audio Stream Input/Output) drivers, which are critical for professional recording software like Ableton Live, Steinberg Cubase, and Avid Pro Tools. Low Latency: Minimizes the delay between an audio input (like a guitar) and the computer's output, a common issue when using generic Windows drivers. Unified Control Panel: Includes a software utility for adjusting buffer sizes and system performance. Broad Compatibility: Designed for the UMC series, including popular models like the UMC202HD, UMC204HD, UMC404HD, and UMC1820. Compatibility & Requirements 6. Free & No Licensing
The "Plug and Play" Myth vs. RealityIf you are on a Mac, you might be used to the "class-compliant" life—plug it in, and it just works. And for basic functionality, that’s great. Driver name: Behringer UMC Series USB Audio Driver v5 However, if you are on Windows, you know the struggle. Without a dedicated ASIO driver, your interface might default to the Windows Generic USB driver. This results in two recording sins:
The Behringer USB Audio Driver v5.30.0 is the bridge between your hardware and your DAW (Digital Audio Workstation). It replaces the generic drivers with a specialized ASIO protocol that ensures low-latency, high-performance audio. Step 3: Disconnect Your UMC Interface
3. Multi-Channel Audio Streaming
Step 7: Optimize Buffer Size
|
| DCM2JPG console
application DCM2JPG is a simple command-line Windows program. If you drop a file on the program it will create a JPEG version of the file (alternatively, if you name the program 'dcm2png.exe' or 'dcm2bmp.exe' it will create PNG or BMP format images). You can also call the program from the command line, to do special functions like change the image brightness or contrast (most grayscale DICOM images have much higher precision than can be saved to standard bitmap formats). Another nice feature is the ability to create nice zoomed versions of DICOM images - e.g. save a 128x128 pixel image as a 192x192 pixel bitmap (scaling is done using a bilinear-interpolation method to reduce any jaggy edges). Both a compiled program and the (ezDICOM-based) source code can be downloaded by shift+clicking here. Here is a short overview of the commands: OPTIONS
EXAMPLE:
TRICKS:
|
| ezDICOM for
programmers The basic concept is that code for ezDICOM can be included in more complicated projects. A good example is Chris Rorden's MRIcro freeware. MRIcro includes a lot of powerful features that are useful for scientists studying the brain. The casual user will find MRIcro much more difficult to use than the basic ezDICOM, but specialist will appreciate MRIcro's additional features. There are actually three versions of ezDICOM available for programmers, depending on the computer language you use. In all cases, the source code is provided, so you can either use the software as a modular unit without needing to learn about any of the details of medical imaging, or you can modify how these components work.
|
 |