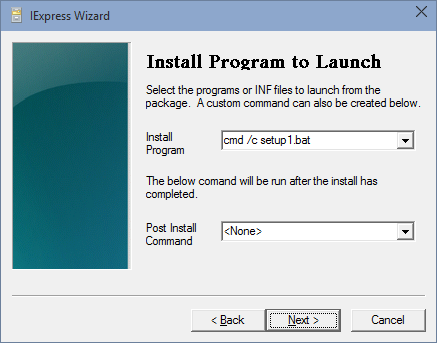
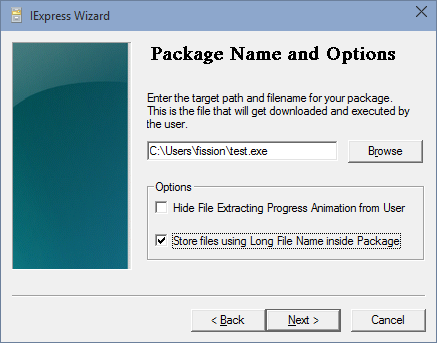
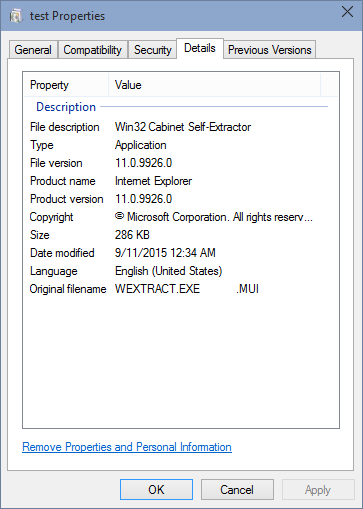
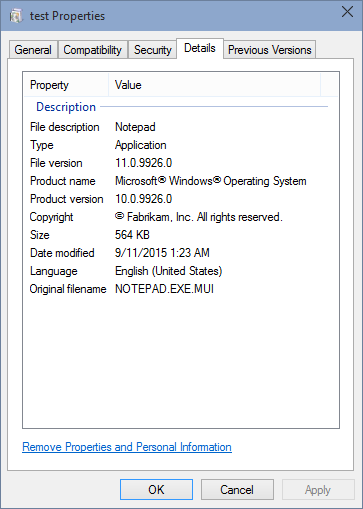
This document will not explain basic usage; it’s meant to keep track of important notes, and to explore the technical workings of IExpress and related utilities (eg makecab.exe).
Myray Irys Software !exclusive! Download Better May 2026
Once, in a bustling dental practice where clarity was the difference between a routine procedure and a complex challenge,
found himself struggling with fragmented imaging systems. His 2D scans were separate from his 3D data, and communicating treatment plans to patients felt like translating a foreign language without a dictionary.
Everything changed when he decided to upgrade his diagnostic toolkit with the MyRay iRYS software. The Transformation
The moment the iRYS software installation was complete, the clinic’s workflow entered a new era of "better." No longer did Dr. Aris have to jump between different programs. The Multi-Desktop system allowed him to browse 2D and 3D views simultaneously with realistic rendering.
One morning, a patient arrived with multiple amalgam restorations that typically caused "noise" in standard scans. Dr. Aris used the 3D SMART (Streak Metal Artifacts Reduction Technology) feature, which automatically cleared the artifacts, making the volumetric images usable and precise. For his panoramic views, the 2D PiE (Panoramic Image Enhancer) filters sharpened every detail, from the dentition to the bone quality. Precision Planning
Planning for a complex implant became a matter of minutes rather than hours. Using the preloaded implant libraries, Dr. Aris simulated the positioning with a few clicks, adjusting for the patient's specific bone morphology. He even used the software to calculate Airway Volumes, identifying a potential sleep apnea issue the patient hadn't even realized they had. Connected Care
The "better" didn't stop at the desktop. During the consultation, Dr. Aris picked up his tablet and used the iRYS Viewer for iPad. He showed the patient the realistic 3D renderings of their own jaw, explaining the procedure in a way that was finally visual and easy to understand. Before the patient even left the chair, Dr. Aris had exported a comprehensive diagnostic report as a PDF to share with them.
By choosing to download and integrate iRYS, the practice didn't just get new software—they gained a "Ray of Solutions" that simplified every stage of the diagnostic process, from acquisition to patient education. Dental Radiography Software iRYS - MyRay
The Ultimate Guide to MyRay iRYS: The Premier All-in-One Dental Imaging Software
In modern dentistry, the efficiency of your clinical workflow depends heavily on the tools you use to manage and process diagnostic images. MyRay iRYS
stands out as the ultimate all-in-one software platform for both 2D and 3D imaging
. Whether you are performing routine panoramic scans or complex 3D implant planning, iRYS is designed to simplify diagnosis and enhance patient communication. Why Choose MyRay iRYS? MyRay iRYS software platform
is built to provide a seamless diagnostic experience through several advanced features: Multi-Desktop Management
: Effortlessly browse between 2D and 3D views with realistic rendering and multiplanar analysis. Implant Simulation
: Streamline implant positioning using preloaded libraries and easily assess bone quality. 3D SMART Technology
: Automatically reduces metal-induced artifacts (like amalgam restorations) to ensure usable volumetric images every time. Airway Volume Analysis
: Essential for investigating ENT disorders or planning obstructive sleep apnea (OSA) treatments. Data Protection & Compliance
: iRYS is data protection-certified and IHE compliant with DICOM networks, ensuring secure image sharing and storage. System Requirements for a "Better" Installation
To ensure the software runs smoothly and handles high-resolution 3D datasets without lag, your workstation should meet or exceed these minimum requirements Operating System : Windows 10/11 Professional 64-bit. : Intel Core i3 or higher (i5 or higher recommended). : 4GB minimum, though 8GB is highly recommended for better performance. : 100GB SSD (250GB recommended).
: Discrete 3D Video Card or integrated GPU supporting 1920x1080 resolution. How to Download and Install iRYS
For the most secure and up-to-date version of the software, it is best to obtain it directly through authorized channels: Official Support : Visit the MyRay Downloads section to access manuals and technical documentation. Local Distributors : Major dental equipment providers, such as RPA Dental , offer official installation support and software updates. iPad Integration : You can download the iRYS Viewer for iPad
from the App Store for quick mobile image consultations within your practice's LAN. Maximizing Your Workflow By integrating iRYS with other MyRay tools like the Zen-X HD sensor Hyperion X9 imaging systems
, you can capture images instantly and share them across your practice's network or with patients in less than a minute. Dental Radiography Software iRYS - MyRay
To download and install the MyRay iRYS software, you should follow the official professional channels provided by MyRay. This software is a high-end medical imaging tool usually bundled with clinical hardware and is not typically available as a direct consumer download link on public websites. 1. Official Download & Support
The best way to obtain the latest version of iRYS or its necessary drivers is through the MyRay official download area or by contacting your authorized reseller. MyRay Download Center : Visit the MyRay Documentation & Resources
page. Here you can find technical data sheets, manuals, and updated software resources for the entire product range. Contact Support
: If you cannot find the specific installation package, use the MyRay Contact Page
to reach out to technical support or your local reseller for a secure download link. 2. Installation Requirements
Before installing, ensure your system meets these professional requirements: Operating System
: Windows 7 or later is required. Mac users must use a Windows parallel environment. Admin Rights myray irys software download better
have Administrator privileges to install the software on your workstation. Installation Media : If you have the original setup CD or USB, run the NT viewer.exe file found in the installation folder. 3. Companion Applications
For more flexible use within your practice, you can download companion apps from public app stores: iRYS Viewer (iPad) : Available on the Apple App Store
. This allows for quick 2D/3D image previews and patient communication via a tablet within the same LAN. MyScan Connect
: A web-based platform for cloud synchronisation and managing patient data across multiple devices. 4. Configuration Tip Dental Radiography Software iRYS - MyRay
The MyRay iRYS software is an advanced dental imaging platform designed to streamline 2D and 3D diagnostics
. While MyRay does not typically provide a direct, public "one-click" download for the primary desktop installation—as it often requires a physical license dongle
and professional configuration—you can optimize your access and experience by utilizing their official support channels. How to Get iRYS Correctly
To ensure you have the correct version and drivers for your specific hardware (like 3D scanners or intraoral sensors), follow these official steps: Official Download Center : Visit the MyRay Download Section
to access the latest brochures, manuals, and technical documentation. Dealer Support
: The primary way to receive a secure software link or updated installation media is through an authorized dealer. They can provide the specific "setup.exe" tailored to your workstation's purpose (e.g., standalone station vs. 3D scanner control). iRYS Viewer (iPad) : For mobile access, you can download the iRYS Viewer for iPad
directly from the App Store. This allows you to visualize and share images archived on your main desktop installation. Key Features to Improve Your Workflow
Once installed, you can make the software work better for your practice by mastering these advanced tools: 3D SMART Technology Streak Metal Artifacts Reduction
feature to automatically clean up images cluttered by metal restorations or implants. Dose Book Tool
: Efficiently manage patient safety by automatically extracting and storing diagnostic exposure data. Multi-Desktop View
: Speed up your diagnosis by using the Multi-Desktop system to browse 2D and 3D views simultaneously with realistic rendering. Reporting & Sharing
: Enhance patient communication by using the "report new" feature to create PDF reports with custom notes, which can be saved or emailed directly. Anatomical Tracing : Use the marker toolbar to precisely trace the inferior alveolar nerve sinus floor for safer implant planning. Installation Tips Dental Radiography Software iRYS - MyRay
For the MyRay iRYS dental imaging software, downloading and maintaining the latest version is essential for optimal 2D/3D diagnostic workflows and equipment integration. Official Download and Resources
Direct Download Page: Access official downloads, including catalogs and technical documentation, directly through the MyRay Download Center.
Mobile App: For portable viewing and patient communication on the go, you can download the iRYS Viewer for iPad from the Apple App Store.
Legacy Support: If you are using older MyRay hardware (like the X-pod), ensures you utilize the iCapture acquisition software alongside iRYS for seamless TWAIN/DICOM interfacing. Hardware & System Requirements
To ensure the software runs "better" (without lag or crashes during 3D rendering), your workstation should meet these minimum and recommended specs:
Operating System: Windows 10 or 11 Professional (64-bit) is required; macOS is supported via Parallels Desktop for some versions.
Processor: Intel Core i3 minimum, but i5 or higher is recommended for smooth 3D processing.
Memory (RAM): 8GB is the standard requirement, though 16GB is often preferred for high-volume 3D datasets.
Graphics: A discrete 3D Video Card (like NVIDIA with at least 1GB dedicated VRAM) is critical; integrated GPUs may struggle with complex volumetric analysis. Key Features for "Better" Use
Multi-Desktop 3D/2D: Switch instantly between panoramic views and realistic 3D renderings to simplify complex implant planning.
3D SMART Technology: Automatically reduces metal-induced artifacts (like those from existing implants or fillings), making volumetric images much clearer.
Dose Book Tool: Automatically tracks and stores patient radiation exposure data for better regulatory compliance and safety monitoring. Dental Radiography Software iRYS - MyRay
MyRay IRYS Software Download: A Better Option Once, in a bustling dental practice where clarity
Introduction
In the realm of computer-aided design (CAD) and 3D modeling, software plays a crucial role in bringing ideas to life. MyRay IRYS is one such software that has gained popularity among designers, architects, and engineers. This paper aims to discuss the benefits of downloading MyRay IRYS software and why it stands out as a better option for professionals and hobbyists alike.
What is MyRay IRYS?
MyRay IRYS is a powerful rendering engine that allows users to create photorealistic images and animations from their 3D models. Developed by MyRay, a leading company in the field of rendering and visualization, IRYS is designed to work seamlessly with various CAD and 3D modeling software. Its cutting-edge technology and user-friendly interface make it an ideal choice for professionals seeking high-quality rendering solutions.
Features of MyRay IRYS
MyRay IRYS boasts an impressive array of features that set it apart from other rendering software. Some of its key features include:
- Fast Rendering: IRYS offers exceptionally fast rendering speeds, allowing users to quickly generate high-quality images and animations.
- Advanced Lighting: The software features advanced lighting tools, including support for HDRI, IBL, and physics-based lighting.
- Material Editor: IRYS comes with a comprehensive material editor that allows users to create complex materials and textures.
- Support for Multi-Threading: The software takes advantage of multi-core processors, making it possible to render complex scenes quickly.
Benefits of Downloading MyRay IRYS
Downloading MyRay IRYS software offers several benefits, including:
- Cost-Effective: IRYS offers a cost-effective solution for professionals and hobbyists who require high-quality rendering capabilities without breaking the bank.
- Improved Productivity: With its fast rendering speeds and intuitive interface, IRYS enables users to work more efficiently and complete projects quickly.
- Increased Realism: The software's advanced lighting and material tools allow users to create highly realistic images and animations, enhancing the overall visual impact of their work.
Why MyRay IRYS is a Better Option
Compared to other rendering software on the market, MyRay IRYS stands out for several reasons:
- Ease of Use: IRYS features a user-friendly interface that makes it easy for users to navigate and master, even for those without extensive rendering experience.
- Cross-Platform Compatibility: The software is compatible with various CAD and 3D modeling software, making it a versatile solution for professionals working with different tools.
- Continuous Updates: MyRay regularly updates IRYS, ensuring that users have access to the latest features, bug fixes, and performance enhancements.
Conclusion
In conclusion, MyRay IRYS software download offers a better option for professionals and hobbyists seeking high-quality rendering capabilities. With its fast rendering speeds, advanced lighting and material tools, and user-friendly interface, IRYS is an ideal choice for anyone looking to enhance their 3D modeling and visualization workflow. Whether you're an architect, engineer, or designer, MyRay IRYS is a valuable addition to your toolkit.
Recommendations
Based on the benefits and features of MyRay IRYS, we recommend:
- Downloading the Latest Version: Visit the official MyRay website to download the latest version of IRYS software.
- Exploring Tutorials and Resources: Take advantage of online tutorials, documentation, and community forums to master IRYS and unlock its full potential.
- Upgrading to a Paid Subscription: Consider upgrading to a paid subscription for access to premium features, priority support, and regular updates.
To download and optimize your use of MyRay iRYS software, it is best to access official channels to ensure you have the latest drivers and viewing tools for 2D and 3D dental imaging. How to Download iRYS Software
Official Manuals & Resources: You can find technical data sheets, manuals, and other useful resources for MyRay devices on the MyRay Downloads page.
Mobile App: For viewing images on the go, the iRYS Viewer is available on the Apple App Store for iPad and Mac.
Installation Guides: For detailed step-by-step instructions on local or server installations, refer to the iRYS Software Installation Guide. Key Features for Better Imaging
3D Smart Technology: This feature automatically reduces metal-caused artifacts from implants or restorations, making volumetric images much clearer.
Multi-Desktop System: Allows you to browse between 2D and 3D views rapidly with realistic rendering.
Preloaded Implant Libraries: Simplifies the planning process by allowing you to select and position implants directly from an extensive digital library.
Dose Book Tool: Efficiently manages patient dose data and allows you to export this information into PDF or CSV formats. Quick Tips for Users
Opening Files: If you receive a compressed CBCT file (.zip), use software like WinRAR to unzip it before opening the NT viewer.exe file to view the scan.
Reporting: You can create diagnostic reports in either portrait or landscape orientation and save them as PDFs to easily attach to emails for referring dentists.
Exporting Images: When sharing with others, you can burn a "viewer disc" which includes a lightweight version of the software so the recipient can view the images without needing a full installation. Dental Radiography Software iRYS - MyRay
The MyRay iRYS platform is a comprehensive imaging software suite designed for 2D and 3D dental diagnostics. It serves as a central "digital ecosystem" that integrates with MyRay X-ray units and scanners to process, view, and share medical images. Key Features of iRYS Software
Multi-Desktop System: Seamlessly switch between 2D and 3D views with realistic rendering and multiplanar analysis.
AI Integration: Includes Powerful image Enhancer (PiE) algorithms and AI-powered filters to highlight anatomical details and improve diagnostic accuracy.
Dose Book Tool: Automatically extracts and manages patient radiation dose data for every scan. Fast Rendering : IRYS offers exceptionally fast rendering
Connectivity: Fully compliant with DICOM networks and accessible via dedicated workstations, office PCs, or the iRYS Viewer app for iPad.
Implant Libraries: Features an extensive, preloaded digital library of implants that is constantly updated for planning purposes. How to Access the Download
Official software downloads are typically restricted to registered dental professionals to ensure regulatory compliance.
Official Documentation: You can download brochures and technical manuals directly from the MyRay Download Center.
Software Requests: For the iRYS installer or updates, you usually need to contact your local authorized MyRay distributor or request a login via the MyRay Radiology Software portal.
Training Resources: Visual tutorials on using the iRYS toolset are available on the Insights Diagnostic YouTube channel. Better Alternatives & Modern Upgrades
If you are looking for more modern or specialized tools within the MyRay ecosystem, consider:
Neowise: A newer dental imaging software focused on centralized data management and even more advanced AI automation.
RealGuide: Specialized software often paired with MyRay systems for advanced surgical planning and guide design.
💡 Key Takeaway: iRYS is highly efficient for general diagnostics, but if your practice is shifting toward advanced AI automation, Neowise may be a "better" long-term choice.
If you'd like, I can help you find a local MyRay distributor in your area or provide more details on how Neowise compares to the standard iRYS platform. Dental Radiography Software iRYS - MyRay
For those looking to streamline their dental practice's imaging workflow, the MyRay iRYS
software offers a comprehensive all-in-one platform for managing both 2D and 3D diagnostics. Key Features of MyRay iRYS
iRYS is designed to simplify the diagnostic process through several advanced tools: Multi-Desktop Management:
Allows users to quickly browse 2D and 3D views with realistic rendering and multiplanar analysis. 3D SMART Technology:
Uses Streak Metal Artifacts Reduction Technology to automatically reduce artifacts caused by metal implants or restorations. 2D PiE Filters:
Panoramic Image Enhancer filters that selectively optimize different anatomical regions for sharper detail. Implant Simulation:
Features an extended library of preloaded implants for precise planning and positioning. Patient Dose Management:
Automatically extracts and stores patient dose data, which can be exported in PDF or CSV formats for sharing. How to Access and Install
Direct downloads for iRYS are typically managed through professional channels rather than public mirrors to ensure security and proper licensing: Official Downloads: Brochures and technical documentation can be found on the MyRay Official Download Page
. For the software itself, practitioners often need to contact authorized distributors like RPA Dental for access and licensing. Mobile Viewing: iRYS Viewer for iPad
is available on the App Store, allowing for real-time image sharing and basic enhancement (brightness, contrast) within a practice's LAN. Installation Basics: Installation requires Administrator rights
on a Windows workstation. The process generally involves installing the core software along with required ActiveX drivers and a hardware dongle key for licensing. System Requirements
To ensure optimal performance for 3D rendering and processing, the following specs are recommended: Processor: Intel i5 or higher. At least 8GB.
Dedicated NVIDIA card with 1GB or more (integrated graphics are not recommended). Stomdevice export images as DICOM files for third-party software? Dental Radiography Software iRYS - MyRay
1. Driver Compatibility is Key
The most common issue is the USB Driver.
- The Problem: Windows 10 and 11 sometimes block the specific drivers required by the Irys sensor cradle.
- The Fix: During installation, if Windows asks for permission to install a device driver, click "Install" or "Trust". If the sensor is not recognized, you may need to install the MyRay Driver Pack specifically, which is usually available in the same download folder as the main software.
7. If You Need a "Better" Version Than What You Have
- Check for updates inside Irys: Help → Check for Updates (only works on licensed versions).
- Contact support – if you have a valid maintenance plan, they will email you the latest build directly.
Official Channels Only
The only safe source is MyRay’s official portal (now under Cefla Dental Group, as MyRay was acquired). Follow these steps:
- Go to the official Cefla Dental / MyRay support page.
- Navigate to Downloads → Software → Irys.
- Register or log in (you typically need your sensor serial number).
- Download the latest Irys Setup executable (e.g.,
Irys_Setup_vX.X.X.exe).
Warning: Avoid “cracked” or “free” versions from torrent sites. They often contain disabled USB drivers, leading to the dreaded “Sensor not found” error.