Show Hidden Finder Link ((better))
Streamline your business operations with our user-friendly tablet-based POS app - Simplify Sales, Maximize Success!

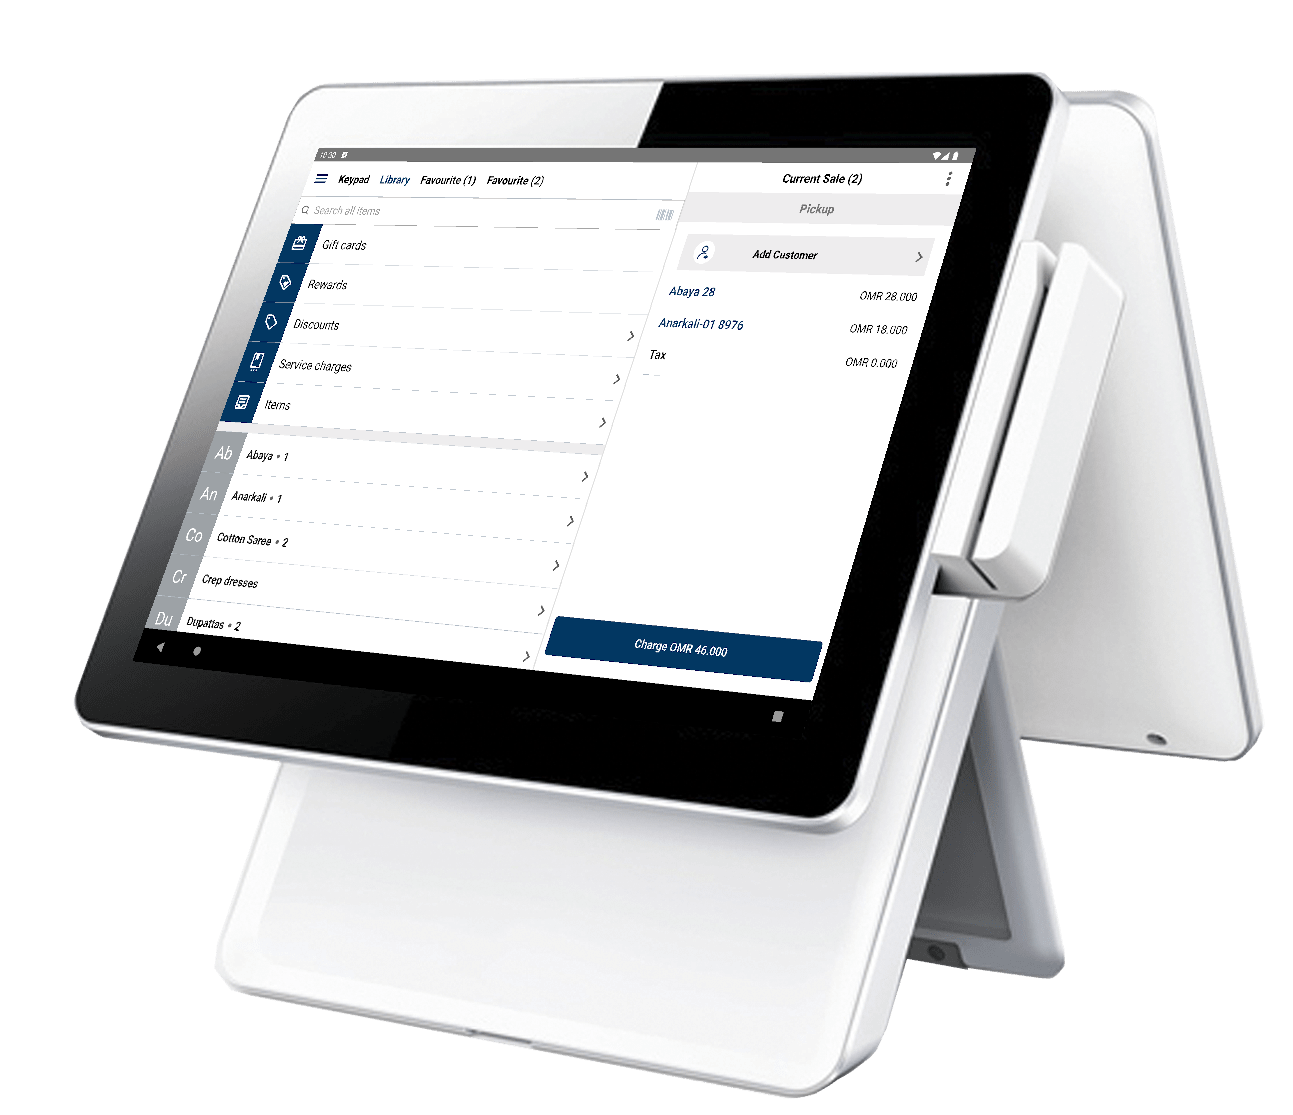
Streamline your business operations with our user-friendly tablet-based POS app - Simplify Sales, Maximize Success!
Our Point of Sale (POS) system is a comprehensive solution designed to streamline and enhance your retail operations. With a user-friendly interface and robust features, our POS system empowers businesses to efficiently manage sales, track inventory, process payments, and deliver exceptional customer experiences
Our POS system enables businesses to process transactions quickly and accurately. With an intuitive interface, you can easily add products to the cart, apply discounts, and calculate taxes. Streamline your sales process with features like barcode scanning, integrated payment terminals, and customizable receipts.
Take control of your inventory with our POS system's powerful inventory management capabilities. Track stock levels, receive automated alerts for low inventory, and easily manage stock replenishment. Real-time inventory visibility ensures efficient stock management, reduces out-of-stock situations, and helps optimize ordering and stocking decisions.
Build and maintain strong customer relationships with our POS system's integrated CRM functionality. Capture customer information, track purchase history, and offer personalized promotions or loyalty programs. Gain valuable insights into customer preferences and behaviors to tailor your marketing strategies and enhance customer satisfaction.
Make data-driven decisions with our POS system's reporting and analytics tools. Generate detailed sales reports, track performance metrics, and analyze trends to identify areas for improvement and optimize your business strategies. Accessible dashboards provide real-time insights into sales, inventory, and customer data.
Our POS system seamlessly integrates with various payment methods, including credit cards, debit cards, mobile wallets, and contactless payments. Accept payments securely and swiftly, providing customers with a smooth and convenient checkout experience. Integrated payment processing eliminates the need for separate terminals, simplifying transactions and reducing errors.
For businesses with multiple locations, our POS system offers centralized management capabilities. Monitor and manage sales, inventory, and customer data across all stores from a single dashboard. This facilitates consistent pricing, streamlined operations, and improved decision-making across your retail chain.
Our POS system features an intuitive and user-friendly interface, reducing training time and increasing operational efficiency. Minimal clicks and easy navigation enable staff to quickly process transactions, access information, and provide exceptional customer service.
Our POS system seamlessly integrates with a Kitchen Display System (KDS), enabling efficient communication between the front-of-house and back-of-house operations. Orders placed at the POS terminal are instantly transmitted to the kitchen display, allowing kitchen staff to view and manage orders in real-time. This minimizes order errors, reduces ticket times, and improves overall kitchen efficiency.
Our versatile POS system supports a wide range of hardware devices, ensuring compatibility and flexibility for your business needs.
Show Hidden Files and Folders in Finder on Mac: A Step-by-Step Guide
As a Mac user, you may have encountered situations where you couldn't find certain files or folders on your computer. This could be due to them being hidden by default. Fortunately, showing hidden files and folders in Finder is a straightforward process. In this article, we'll walk you through the steps to reveal these concealed items.
Why Are Files and Folders Hidden in Finder?
By default, macOS hides certain files and folders to prevent users from accidentally deleting or modifying system files. These hidden files and folders are usually system files, cache files, or configuration files that are essential for the operating system to function properly.
Method 1: Using Keyboard Shortcut
To quickly show hidden files and folders in Finder, use the following keyboard shortcut:
Cmd + Shift + . (dot) on your keyboard.This will toggle the visibility of hidden files and folders. You will see them appear with a slightly faded or transparent icon.
Method 2: Using Finder Preferences
Alternatively, you can show hidden files and folders through Finder preferences:
Finder in the top menu bar.Preferences from the drop-down menu.Advanced tab.Show all files at the bottom of the window.Method 3: Using Terminal Command
For those comfortable with using the Terminal app, you can use a command to show hidden files and folders: show hidden finder link
defaults write com.apple.finder AppleShowAllFiles YESOption key and right-clicking (or control-clicking) on the Finder icon in the Dock, then select Relaunch.To hide files and folders again, use the following command: defaults write com.apple.finder AppleShowAllFiles NO and relaunch Finder.
Tips and Precautions
Conclusion
Showing hidden files and folders in Finder on your Mac is a simple process that can be accomplished through keyboard shortcuts, Finder preferences, or Terminal commands. By following these steps, you'll be able to access and view files and folders that were previously concealed. Remember to exercise caution when dealing with system files to avoid any potential issues with your Mac.
To show hidden files and folders in macOS Finder, you can use a quick keyboard shortcut or a Terminal command. Quick Keyboard Shortcut
The fastest way to toggle hidden files in any Finder window or "Open/Save" dialog is to use this key combination: Stack Exchange
Pressing this once will make hidden files—which usually appear with a pale or grayed-out color —visible. Pressing it again will hide them. Alternative Methods Using the Option Key : While in Finder, click the menu in the top menu bar. Hold down the key, and the hidden folder will appear in the list. Terminal Command
: For a permanent change (or if the shortcut doesn't work), open the
(found in Applications > Utilities) and run these two lines: defaults write com.apple.finder AppleShowAllFiles YES killall Finder To reverse this, replace and run the commands again. Why are some files hidden?
How to show all hidden files in Finder? - Apple Stack Exchange Show Hidden Files and Folders in Finder on
This report examines methods for revealing hidden files in macOS Finder, a common requirement for developers and advanced users to manage system configurations, clear large caches, or remove residual application data. Executive Summary
Most files in macOS are hidden by default to prevent accidental modification of critical system data. Users can toggle their visibility using a native keyboard shortcut, the Terminal utility, or third-party applications. Primary Access Methods 1. Keyboard Shortcut (Native Toggle)
The most efficient way to view hidden items is through a built-in keyboard combination while in a Finder window. Command Key: Command + Shift + . (Period).
Visual Indicator: Hidden files appear as semi-transparent or light gray icons.
Behavior: This acts as a toggle; pressing it again will hide the files once more. 2. Terminal (Permanent Setting)
For users who require hidden files to remain visible across reboots and new Finder windows, the Terminal application provides a more permanent solution.
How to turn on hidden files and folders in the macOS - Autodesk
To reveal hidden files and folders in macOS Finder, the quickest way is a simple keyboard shortcut. The Magic Shortcut While in any Finder window, press: Command (⌘)
This instantly toggles the visibility of hidden files, which appear as slightly dimmed or semi-transparent icons. Press it again to hide them. Blog Post: Master the Mac: Unlocking Hidden Files in Finder Introduction
Ever felt like your Mac was keeping secrets? Whether you're a developer hunting for a .gitignore file or a power user trying to clean up the Open Finder on your Mac
folder, macOS hides thousands of system files by default to prevent accidental deletions. But sometimes, you need to see exactly what's under the hood. The Fastest Way: Keyboard Shortcuts
The days of digging through Terminal commands are over. Apple built a secret "toggle" directly into Finder. Navigate to any folder (like your Home folder). Cmd + Shift + . Watch the magic happen: Hidden files, usually starting with a dot (like ), will fade into view. The "Old School" Way: Terminal
If you prefer a permanent change that persists even after a reboot, the is your friend.
defaults write com.apple.finder AppleShowAllFiles YES; killall Finder
defaults write com.apple.finder AppleShowAllFiles NO; killall Finder When Should You Use This? Managing Configuration: Editing files like .bash_profile Troubleshooting: Accessing the hidden folder to clear application caches. Freeing Space: Finding "ghost" files left behind by uninstalled apps.
Show hidden files (like htaccess) in Mac OS X - Alex Turnwall 09-Jun-2013 —
Hidden files are hidden for a reason. Do not move, rename, or delete:
.bash, .zsh, .config~/Library/Keychains folderWhen in doubt, Google the file name before deleting.
Command + N if none are open).Result: Instantly, a gray bar will slide up from the bottom of your Finder window. Congratulations—you have just shown the hidden Finder link. You can now click any of the folder names in that bar to jump instantly to that location.
To hide it again: Simply go back to View > Hide Path Bar.
If you want Library to always appear in your home folder (no Option key required), run this Terminal command:
chflags nohidden ~/Library/
Now, whenever you navigate to your User folder, you will see the yellow Library folder waiting for you.
Our cutting-edge sales solutions have successfully empowered over 1000 businesses to achieve remarkable growth and revenue generation, positioning them at the forefront of their industries. With our expertise, innovative strategies, and tailored approach, we consistently deliver unparalleled results, propelling sales and driving success for our vast clientele.
Deliver great service experiences fast - without the hassle of complicated, outdated systems or the need for extensive training or technical expertise - with our simple online modern POS application.
We are here to assist you! If you have any questions, feedback, or need further information about our POS services and features, please don't hesitate to reach out to our dedicated support team. You can contact us through the following channels:
[email protected]